DOP | Camera operator
TheBotanist_Drone_shoot01_1.37.1.jpg

Blog

CAMERALAB | CANON C70

Greetings and welcome to my blog!

For those who are new here, I've previously posted articles about camera and filming gear tests which can be found on the right-hand side of this article.

Recently, I had the opportunity to test the new Canon C70 and I would like to express my gratitude to Canon for allowing me to use it for a week.

Canon C70 camera body

I want to clarify that I am not a Canon ambassador nor have I been paid by them. This review is solely my honest opinion about the camera's capabilities and features.

Without further ado, let's delve into the details. I tested the camera for 5-6 days, both indoors and outdoors, in various lighting conditions and formats, and I must say, the Canon C70 is a significant advancement for Canon.

I used the Canon C300 mk1 for my first documentary in 2015 (available on Amazon Prime), and since then, Canon has made significant improvements, and the C70 is the latest addition to their fantastic collection of cinema cameras. The C70 shares the same C300 MkIII sensor, a 4K Super 35mm DGO sensor, which produces clean low-light image quality and over 13 stops of dynamic range. (UPDATE: see the latest camera test for Cinema Light - RAW here).

Although I did not have the opportunity to test it on an actual job, what follows is an honest and objective opinion about the camera and its features.

design

Canon_EOS_C70-1410x793.jpeg
download.jpeg

The body of the C70 feels sturdy and has a grip that resembles the Canon 1DX mk2. Holding it feels like having a large DSLR in hand, but surprisingly, it's not heavy. I believe that Canon has a better approach to usability design compared to other manufacturers.

Schermata 2021-04-13 alle 19.23.45.png

The device has 12 distinct buttons that are pleasant to the touch, easily identifiable, and responsive. However, the button located near the thumb on the right-hand grip feels somewhat awkward, as I occasionally felt it could be pressed accidentally.

Schermata 2021-04-13 alle 19.28.40.png

It's interesting to note that the Canon EOS C70 doesn't come with an electronic viewfinder, despite its mirrorless/DSLR design. Relying solely on the LCD screen could prove challenging, especially in bright or overcast conditions. While attaching a monitor is an option, it takes away from the camera's portability.

FEATURES

Below you can find the features of the camera

Sensor: 8.85MP Super 35mm Dual Gain Output 
Lens Mount: Canon RF
Processor: Digic DV7

Video formats: XF-AVC (MXF) ALL-I or Long GOP, 4:2:2 10-bit • MP4 H.265/HEVC, 4:2:2 10-bit • MP4 H.264, 4:2:0 8-bit • 26.2 x 13.8 mm (29.6 mm on the diagonal) in 4096 x 2160 or 2048 x 1080 • 24.6 x 13.8 mm (28.2 mm on the diagonal) in 3840 x 2160 or 1920 x 1080

Frame Rates: 59.94Hz mode (59.94P / 59.94i / 29.97P / 23.98P) • 50.00Hz mode (50.00P / 50.00i / 25.00P) • 24.00 Hz mode (24.00P) • Slow-motion 4K up to 120fps • Slow-motion 2K (crop) up to 180fps (audio recording at normal frame rate possible)

Gamma curves: BT.709 Wide DR (T.709 Gamut), C-Log2 (Cinema Gamut), C-Log3 (Cinema Gamut) PQ (BT.2020 Gamut), HLG (BT.2020 Gamut)

ISO: Base ISO800 • Dual Gain Output ISO160-25600 (expandable to ISO100-102400) 
Dynamic Range: 16 stops 

Autofocus: Dual Pixel CMOS AF, Contrast AF (Face Priority, Face Only and Tracking AF modes available), with EOS iTR AFX (head tracking)

Controls: Peaking, waveform, zebras, false color display, markers
Shutter speed: 1-1/2000 sec depending on frame rate
Shutter angle: 11.25º to 360º depending on frame rate
Filters: Built-in ND filters in 2, 4 or 6 Stops (10 in extended mode)
Memory card: 2 x SD/SDHC UHS-II
LCD: Fully articulating 3.5-inch touchscreen • 2.76 million dots (1280 x 720 x RGB)

Connectivity: Mini XLR 3-pin connector x2, 3.5 mm audio in stereo mini jack (input only), 3.5 mm stereo headphone mini jack (output only, camera body), HDMI Type A (output only), USB Type C (USB 3.2 Gen1), Time Code BNC / HDMI, Remote A connector 2.5 mm stereo mini-jack (input only

Size: 160 x 130 x 116 mm
Weight: 1,190g (with grip belt and measure hook)

I must say I was thoroughly impressed. The design of the camera is sleek and compact, making it easy to handle and carry around. The image quality is top-notch, with sharp details and vibrant colors that really bring your footage to life.

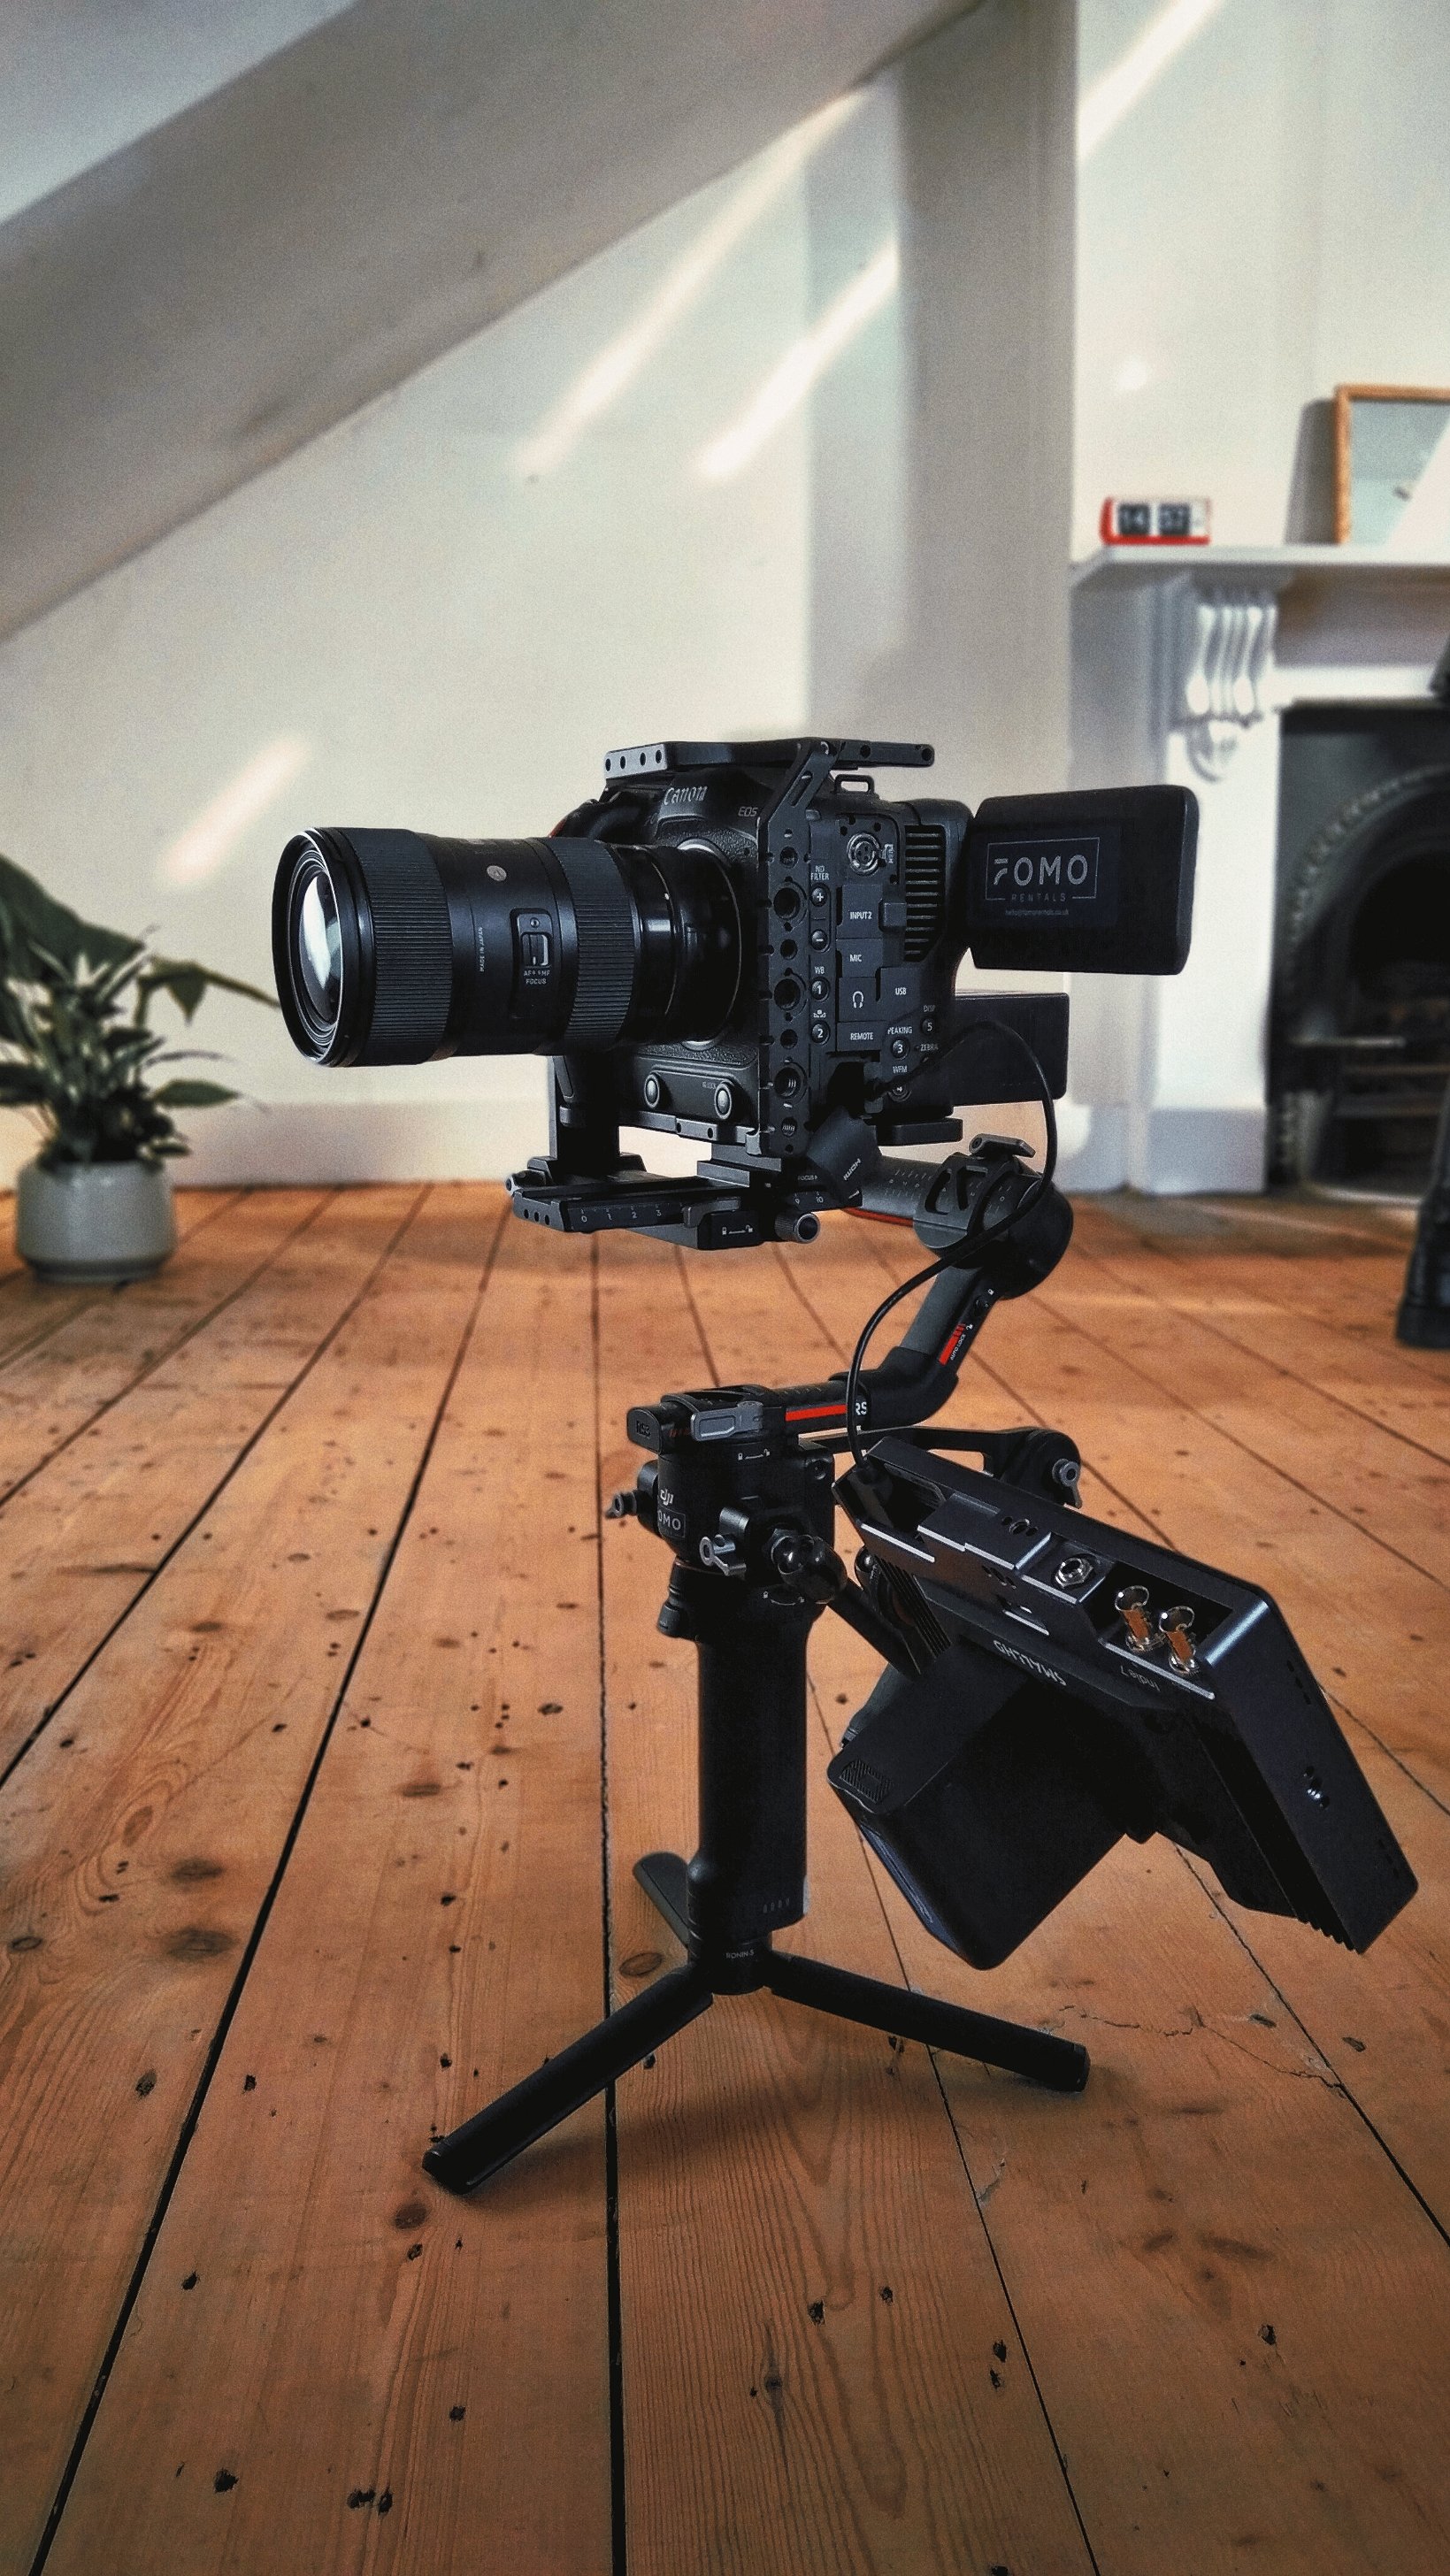
One of the standout features of the Canon C70 is its ability to shoot in 4K at 120 frames per second. This allows for incredibly smooth slow-motion footage that really adds a professional touch to your work. The autofocus system is also very impressive, with quick and accurate tracking that keeps your subject in focus even when it's moving around. But that's not all - the Canon C70 is also a great camera to use with gimbals.

The compact design and lightweight body make it easy to mount on a gimbal, which allows for even smoother footage when you're on the move. The image stabilization is also top-notch, which means you can get steady shots even when you're walking or running.

Another great feature of the Canon C70 is its audio capabilities. The camera has built-in XLR inputs and an audio control panel, making it easy to capture high-quality sound that's perfectly synced with your video footage. The camera also has a built-in ND filter, which helps to control exposure and maintain consistent lighting in any environment.

Overall, I would highly recommend the Canon C70 to anyone looking for a powerful and versatile camera that can handle a wide range of shooting situations. Whether you're a professional filmmaker or a hobbyist looking to take your videos to the next level, the Canon C70 is definitely worth considering. And if you're looking to use it with a gimbal, you'll be happy to know that it's a great choice for that too.

canon c70 gimbal DJI Ronin
BEHIND THE SCENE | XADI feat. NINA COBHAM - Manana Music Video

It’s a very challenging moment for everyone in our industry. With rules changing every week or so and COVID-19 numbers scarily going up every day, it’s difficult to find jobs and have consistency and keep up with good quality jobs.

I’m very pleased I had the chance to work on the latest music video for XADI feat. NINA COBHAM - Manana. Shot in one day, 3 different locations and a small budget, we managed to pull out a nice looking series of frames. I’m very pleased with what we got considering a big challenge with the weather and lots of last-minute changes.

More important, I’m very pleased I got the chance to work alongside nice people and we spent a nice day together, going through every scene with a nice crew attitude and good mood.

We shot with the same setup I tested a few months ago:

  • Sony FX9 (sensor on 16:9, Cinetone)

  • Atlas Orion Set B Anamorphic (cropped to 2:39:1)

  • Set of Schneider Hollywood Black magic filters

All kit has been supplied by Shootblue, they never miss a chance to be pure legends! Thank you guys!

Schermata 2020-10-15 alle 17.23.00.png

Big thank you to Xadi, Nina, iluvlive production, Caleb Mapoma (Director), Dominka (1st AC), Nicolas (Cam trainee), Sachin (Gaffer) and everyone else that helped on set!

Here some of the BTS shots, looking forward to publish the final edit soon! Stay tuned!


DSC01203_1.jpg
DSC01256-2_1.jpg
DSC01272-2_1.jpg
BEHIND THE SCENE | WILLIAMS FW43 CAR LAUNCH

HOW DO YOU SHOOT A CAR COMMERCIAL?

As people asked me a lot of questions regarding the lighting and more details about the shoot, I decided to write down a post about the creative process, lighting choices and the various challenges that are behind this film:

Unfortunately, because of the cancellation of the first part of the F1 Season due to Covid-19 and the forfeit from the major sponsor, Williams Racing had to create another livery for the car and make another film for the car reveal so this is not the official film anymore but it went online on February 2020 as the official car reveals for the Formula1 season 2020. It did get some pretty good reviews, so shout out to everyone involved in the production process, especially Director Jonathan Donnelly @ RD Content who believed in the vision I had and Andrew Griffin @ RD Content for making it happen!

Creative process

We started with gathering a few ideas and discussing about the creative approach. One of the film we came across was the “AUDI - Cooling Down” film, directed by Dan DiFelice, DOP Sebastian Blenkov.

You can read more about this project here.

Taking inspirations from the film we wanted to create something similar, with a strong use of sound design and lighting.

We didn’t have enough time to get a motion control arm setup on set and we didn’t have time for post-production team to work on 3D details or animations, so we needed to find a different direction.

We decided to film a single-shot sequence and use moving-head lights in order to enhance the firing up of the car. Then, reveal the new livery in its beauty with a full view of the car. The basic idea was that shoot two different takes: the first part needed to present the car in silhouette, with lighting and sound creating a suspense, the second part needed to reveal the new livery.

Animatic

An F1 car is a very delicate and desired object, especially ahead of the Barcelona Testing weeks. We wanted to get the best out of our time with the car, so we created a 3D animation to replicate the camera movement and start planning how many shots and time we needed on set and for post-production. When we finished the 3D animation we sent it to our sound designer, who started building the soundtrack based on that.

Lighting

While working on sound, we started talking about Lighting: we wanted the first part to give a sense of contrast and raw power, while the second one could be smooth and focused on the details of the car.

We took references about the studio we were going to use (Junction Elen studios) and the kind of lighting setup that we could have in place and how to move them between take one and take two. We also started to build some sort of practical light for the background in order to give a bit more depth in the first shot, using Astera Titan Tubes.

IMG_20200212_182842.jpg
IMG_20200212_181552.jpg

We also started to build some lighting previews for the client, in order to get the sign off on the lighting quotes. We created some simple scenarios for the first part of the film with Cinema4D and Cinetracer so we could have a pretty good idea of the space and the camera movement as well.

Lighting setup

Camera

I decided to shoot with the Alexa Mini LF on steadicam, Open gate format, RAW. The reason why I decided to go for this format was that we needed enough DOF for the background and because we needed to deliver different formats: 2:39:1, 16:9, 1:1 and 9:16 for Instagram. Shooting Open Gate allowed us to get enough margin to then crop the image as we wanted in post.

We also started to do some tests in studio with the steadicam in order to get the timing right.

Shooting day

On shooting day, we arrived at Junction Eleven studios around 10 PM, waiting for the car to arrive around 2 AM. The key was to give us enough time to rehears multiple times and test different lighting setups.

Schermata 2020-07-30 alle 17.34.26.png
Schermata 2020-07-30 alle 17.34.36.png

The shoot was planned in order to have the car for at least 8 hours, but we ended up having it only 4 hours. We then needed to get back home and start editing, grade the film in order to deliver it 2 days after. Our initial strategy really paid off as we manage to get everything in the right place when the car arrived and we started to shoot straight away.

First shot

I filmed some BTS images during the first part of the shoot, have a look at the video below. As you can see, we started practising with two tables in the middle of the studio. Then, when the car arrived, we managed to get a few takes with different lighting setups so we could have a choice in the post-production process.

Second Shot

After we nailed the first shot, we had to quickly change the lighting setup for the second part of the film. We used two ARRI 5K for the ultra bounce polyboard on top of the car, other two ARRI 5K for the front and one ARRI T5 for the background. In order to have the kind of beauty shot we had in mind, we needed a soft-top source and a bright floor in front of the car to separate it from the background.

In this case, the lighting setup was pretty easy, the difficult part was to shoot starting from the full view of the car and finishing on the rear wheel, the priority was to have a good looking end frame. In this way, we then had to reverse the shot in post-production and match the timing with our animatic reference.

9e929f6f0290370b27a277140a52c0ae.jpg

We finished filming around 7am, right in time to hand-over the studio for the stills session. The car then departed to Barcelona, for the 2020 Spring test session at Circuit de Montmelo. I’m pretty happy with the final result, especially because we managed to organize every aspect of the filming and be prepared for any inconvenience ahead of the shoot. Shout out to Director Johnny Donnelly, Andrew Griffin, Jeff Clark, Dominika Besinska and Jake Morris for the hard work on set!

Last but not least, find the equipment list below:

  • Camera: ARRI Mini LF

  • Lenses: FF High Speed Prime Line - 35mm, 40mm, 50mm

  • Focus: RT motion mk1

  • Field Monitor: SmallHD 503 Ultrabright

  • Client Monitor: Atomos SUMO 19

  • Wireless remote: Teradek Bolt 500

  • 2x Titan Tubes 8 Kit

  • 4x ARRI 5K

  • 2x ARRI T5

  • 8x 4x4 Folding Black Flag

  • Various C-stands, heavy duty C-stands, heavy duty wind up, sand bags.

CAMERALAB | SONY PXW-FX9 FF and ATLAS ORION ANAMORPHIC

Hi Everyone!

Here’s my first blog post, where I’ll showcase some behind the scenes from my work, posting some 35mm film stills and talking about some camera tests. I hope you’ll enjoy it even though I’m not a good writer and I’m not good at keeping a blog updated, sorry in advance!

This first post is focused on the PXW-FX9, the latest full-frame camera produced by Sony, and some tests I did back in June 2020 with Spherical and Anamorphic lenses @ Shootblue, right after they re-opened their offices. If you don't know them, have a look at their website or ask for a demo, they have a lot of equipment available and great facilities for professionals to test out filming equipment.

IMG_20200609_125557.jpg

Sony developed this camera based on the PXW-FS7, one of the most interesting and versatile cameras on the market. I personally used the FS7 on may shoots since it came out 6 years ago. I shot mainly interviews and corporate videos with it but also documentaries and branded content videos. To be brutally honest, I never liked the colourimetry and some other features of the camera, the user menu, the EVF and the monitor.

Schermata 2020-07-15 alle 16.33.34.png

Sony created something different this time, taking inspiration from the big sister SONY Venice and trying to put them inside a new FS7 camera body. A Full Frame camera, with a new colourimetry and new specifics:

  • 6K full-frame sensor.

  • Dual Base ISO 800/4000.

  • AF with face detection and Eye-AF.

  • 4K 4:2:2 10bit internal recording.

  • UHD up to 60 fps, HD up to 180 fps.

  • Four channels of audio.

  • External 16-bit RAW (added with the latest firmware)

  • 10-bit S35 4K at 120fps to an external recorder.

For full specifics, please visit the Sony website.

I went to Shootblue to test this camera for the first time with a lot of questions and expectations: I wanted to find a cheap alternative capable of filming with Anamorphic lenses instead of going for an Alexa Mini. Before testing the FX9, I went on the CVP lens tool page and tested how much difference I could get from the two sensors.
What you find below is a series of tests between the FX9 and the Alexa Mini sensor, using the 32mm Atlas Orion Anamorphic, and applying the 2:39:1 aspect ratio (green line).

FX9 sensors - Dimensions: 35.688mm (H) x18.818mm (V) x 40.345mm (diagonal)

Alexa Mini sensor - Dimensions: 26.400mm (H) x14.850mm (V) x 30.290mm (diagonal)

As you see, the Sony FX9 sensor can cover the lens in the 2:39:1 aspect ratio, even though you must cut the external area in post-production. IMPORTANT! The FX9 is not ready to manage anamorphic de-squeeze in-camera yet and this is what pushed me to go and test the camera directly at Shootblue. Below you can also see the comparison between the two sensors:

Lens Test

Happy with this comparison, I went to Shootblue so I could test in person. It’s always easy to find the pro-cons when you actually have the camera in your hands, especially because of the way you operate: your personal style is the key of your work and if you are not comfortable with the setup that’s going to give you more problems than you can imagine.

I first tested the camera with an EF Canon lens, mounted on an E to EF mount adaptor. I used a 14mm L f2.8 Canon lens in order to have an initial feeling with the camera on both FF and S35 cropped mode.

I then started playing with the Atlas Orion 32mm on FF mode. This is what you actually see on camera, as you can’t de-squeeze automatically.

This is what you get when you shoot anamorphic with this setup, with a recording format XAVC-I DCI4K 25p, bit rate 250 Mbps. and a pixel dimension of 3794x3168. I opened the file with SONY RAW Viewer, a software that I often use to have a preview of .MXF files. I then exported the file as PRORES4444HQ and applied a fast colour correction and 2x de-squeeze, so I could get this final image:

Following you can find what is the area covered in 2:39:1

In order to have a nice preview of this framing, I had a field monitor on camera (SmallHD 502) and a SmallHD Cine7 as client monitor. Those monitors will give you a 2x de-squeeze and you can zoom in enough to cut out the edges of the picture that you don’t want to see. It’s a tricky way but it works just fine.

The only problem I had was that when you switch to 50FPS the camera crops the sensor to S35. It’s not a huge problem, but to be brutally honest I don’t like it at all. You have the same issue with cameras like RED, and you must consider this aspect when planning to use anamorphic lenses. In this case, the widest lens in the Orion set is 32mm, so when you crop the sensor you’ll get something close to a 50mm anamorphic lens.

I really liked the quality of the image in post-production. Sony improved the colourimetry and it’s very similar to what you’ll get with the Sony Venice. Skin tones look goods and when playing around in Resolve DaVinci 16 I had the feeling that everything was more balanced and easier to play with.

I’m planning to use this setup for an upcoming project and I hope I’ll have the chance to share a bit more in the next couple of months about it. Generally speaking, a lot of people are selling their old FS7 and buying a new Sony FX9 and I can see why. Personally, I prefer to invest in lenses or accessories as the market moves very fast, a camera like this could be beaten in a matter of months by another competitor such as Blackmagic or Canon and I believe that you always have to consider the different aspects of a project and then choose the right tool for the occasion.

Don’t forget to leave a comment!

See you on the next one!